Monday, July 17, 2023

Sew It - Show It Picnic Party Challenge

Hello, and welcome to the Sew It-Show It Picnic Party Challenge created and hosted by the talented and wonderful Carol of Just Let Me Quilt.   

This month Carol challenged us to create a picnic accessory or quilt.  When I think of picnics, I think of good food set out on a blanket, a cooler full of beverages swimming in ice, and kids running amuck while the adults try to relax.  Oh, yeah, those were the days!

One of the biggest challenges I had on picnic was keeping the kids from whining they had nothing to do when their energy levels dropped.  For my project this month, I created an activity picnic quilt with games for the kids.   


The quilt measures approximately 48" x 63".


I added a pocket with a button closure to 
the bag to hold the game markers.


For the Hop Scotch game, I made a marker out of a Mason Jar lid and glued a piece of cardstock to the top.  You can still buy Hop Scotch markers (called Hoppy Taws) at Walmart and Amazon.  In a pinch, a smooth rock or other small object would work just as well.


The checker pieces are made out of foam.  Pebbles and twigs would work if you choose to do a nature hunt.  I even thought pieces of candy would work.  YUM!  


For the Toss Game, I made tiny bean bags and filled them with some small Christmas jingle bells I had on hand.  They make a cute sound when tossed.  Again, anything you can find will work as well. 


The Tic Tac Toe pieces are cut out of a foam, but can easily be replaced by whatever you have around the picnic area.  


All of the marker pieces fit nicely in the pocket on the back of the quilt, and the button closure works well.  A zipper or Velcro would also work.  


I made this quilt out of pastels on a white background because that's what I had on hand, and I'm doing my best not to buy new but use up my stash.  However, if I was really going to use this quilt as a picnic blanket, I might be inclined to use darker fabrics.  

And while this works well for a picnic party, I think it's an excellent activity for rainy days.  Throw it on a carpeted floor (tile might be too slippery) and let the kids amuse themselves.

I hope you liked seeing my project for Carol's challenge this month.  Thank you, Carol, for another fun challenge to keep us on our toes!  Be sure to visit the other bloggers to see what they have created for their picnic parties.    


July 17

 July 18

Inflorescence


July 19

 
July 20


Stay cool!

Monday, June 19, 2023

When Pigs Fly Sew-It Show-It Challenge Blog Hop


It's time for another fun Sew-It Show-It Challenge!  This one was the brainchild of Joan at MooseStash Quilting .  Thank you, Joan, for hosting this month's challenge.  I don't know where you come up with all these ideas, but I am so glad you do!

Joan's directions for this challenge was to dig into our past projects that for some reason were never completed.  In my case, it wasn't a question of what shall I do, but which one will I do?!  I have quite a stash of PIG's (projects in grocery bags), UFO's (unfinished objects), and WIP's (works in progress). 

The project I chose was a PIG that has set in my closet for many years.  Surprisingly enough, the top was finished but needed to be assembled into a quilt.  No, it is not a tribute to KISS even though one of the characters resembles Gene Simmons. 


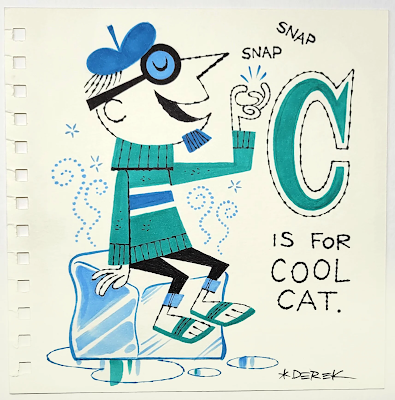
I love all things Beatnik, including tiki art, rat fink dragsters, coffee shops, and jazz.  My friend Mike in the 4th grade had older brothers.  Of course he emulated their ever move, and when they started snapping their fingers, wearing black turtlenecks, and saying, "Cool, man, cool," he followed suit.  Well, I and my classmates thought Mike was a pretty cool dude, so we copied him.  We thought we were the coolest 9-year-olds on the planet.  Hence, my love for all things Beatnik and my motivation to design a tiki quilt.

artwork by Derek Yaniger

I think the reason I never finished this quilt before is because I'm not crazy about the colors.  If I were to do it again, I would make the guys aqua blue and lime green.  But this quilt is not for the faint of heart.  It has so many pieces to it I am surprised I even finished the top. 


The backing is pieced with two large tiki fabric remnants.  The overall size is approximately 42"x60".  The tiki blocks are 10"x22".   


 I hope you enjoyed my project and my walk down Memory Lane.  Be sure to check out the projects of the talented quilters listed below.  They are sure to delight!  As for me, I think I will grab me a cup of expresso and listen to some cool jazz.  

artwork by Derek Yaniger

Can you dig it, Daddy-O? 

Wednesday, May 17, 2023

Rose-Colored Glasses Sew-It Show-It Challenge


Today is the last day of this fantastic hop and my day to show you my project for the Rose-Colored Glasses Sew-It Show-It Challenge.  This month's challenge is the brainchild of Carol at Just Let Me Quilt.  Thank you, Carol for hosting this fun blog hop.  I don't know where you come up with all these great challenges!

Carol challenged us this month to create something using rose or pink fabric, eyeglasses, roses, or positive words.  I have worn glasses since I was in the 4th grade, so naturally I chose to focus on glasses.

This was one of those projects that just kept growing as ideas bloomed.  I decided to applique a cute girl in rose-colored glasses on the front of a tote bag.   I was ready to stitch her down when I began to get ideas.  It was as if this cute little miss was talking to me, saying, "Hey, I'm not just another pretty face!"  

So after a little thought I added a few things to my design.

--Instead of sewing her directly onto the tote, I sewed her onto a large pocket big enough to hold a full-size magazine. 

--I added eyelets to her ears (which are free-standing) so she could hold my earrings.  

--I added buttonholes in her hair so she could hold my glasses/sunglasses.

--I added buttonholes on either side of her neck so she could hold a necklace or scarf.  

I sewed the pocket to the tote, and Rose became functional as well as cute, my gal pal for when I go to the gym or the beach. 
 
A nice big tote.


Rose is the perfect debutante in her rose-colored glasses and 
Peter Pan collar.  If you look closely, you can tell her collar 
and glasses are made from the same pattern.  Her glasses are  
made from a piece of clear vinyl tinted with a red Sharpie pen.


At the gym, Rose can hold my glasses and jewelery for me.


Rose can hold my sunglasses, earrings, and scarf 
while I take a dip in the pool.  The pocket easily 
holds a magazine and the tote can hold a
beach towel with room to spare. 


Rose's pocket is 11"x12", big enough to hold a large magazine or book, and the bag is nice and roomy, overall about 17"x17".

Rose and I are ready for any beach trip or shop hop that comes our way!  

I would love it if you would leave me a comment, and then go see the other fabulous inspirational projects at the sites listed below:


Monday, April 17, 2023

SAY WHAT? Sew It Show It Challenge Blog Hop

 The word of the day is Enjoy!  


SAY WHAT???  Another Sew It - Show It Challenge???  Well, shut my mouth!

When Joan of Moosestash Quilting challenged us this month to come up with some kind of project featuring words I almost decided to pass.  What sort of quilting project features words?  I've made quilts with quotes before but I just wasn't getting inspired.  

Then I saw this little magnet on my fridge --  "How Do You Feel Today?"  An idea was born!

When my kids were little they couldn't always find the right word to explain how they were feeling.  If they had possessed a poster (or quilt) to point at to show me how they felt, we might have communicated better.  Of course I had boys, so their Emoticons would have included Grumpy, Stinky, Indifferent, Poopy, and Rabid.  Just sayin'.

So for my project, I made a small emoticon quilt to hang up in a child's room.


I only chose 9 basic emotions, but there are dozens more I could have picked.


To save time, I decided to embroider the words explaining the expression.  I used raw-edge machine stitching to outline the faces and features, using a flesh-colored zig-zag stitch for their noses.  

If I had included an emoticon for myself, it would have been Exhausted.  Although it's a tiny quilt, only about 33" x 37", it was time consuming to draw cut, paste, sew, embroider and embellish each 8" block.  The things I talk myself into!  But I love the finished result, and it will look cute in my grandkids' toy room.  

And then another idea came to me.  I have been wanting to make placemats for kids for a long time.  I thought these would make great Christmas gifts for my sons and their little ones, but little ones don't stay little long, and that time has passed.  Still, it was a cute idea.  

I call these "Yummy in My Tummy Placemats."  I have a dozen more, but I just didn't have the time to make them all.  My reasoning behind these placemats was to encourage kids to eat their dinner.  There is no incentive on earth that will encourage a kid to eat broccoli, but a mom does get tired of saying, "Just one more bite, please, honey?" 

These were a lot of fun to make, but also time consuming. 


I made 4 of these placemats to encourage kids to eat . . . and 2 to remind me to step away from the table.  But just like the broccoli, I would need a lot more persuasion to skip dessert.  Not all of us have Joan's willpower!


And that's the end of my tale.  Thank you, Joan, for hosting such a fabulous challenge!   No one likes a gabby blogger, so I will end this soliloquy and suggest you check out the other chatterboxes in this great blog hop. 

Wednesday, March 22, 2023

Little Green Apples Sew It-Show It Challenge Blog Hop


Welcome to the Little Green Apple 

Sew It - Show It Challenge!

The March Sew It - Show It Challenge is being hosted by Carol of Just Let Me Quilt.  I don't know where Carol comes up with these great ideas, but they are always loads of fun!  Thank you, Carol, for all your hard work and creativity.

This month Carol has challenged us to sew something in green or apple fabric, or both!  I have challenged myself this year to use up my stash and not buy new.  Can you believe it?  In two rooms full of fabric, I do not have a scrap of apple fabric. 

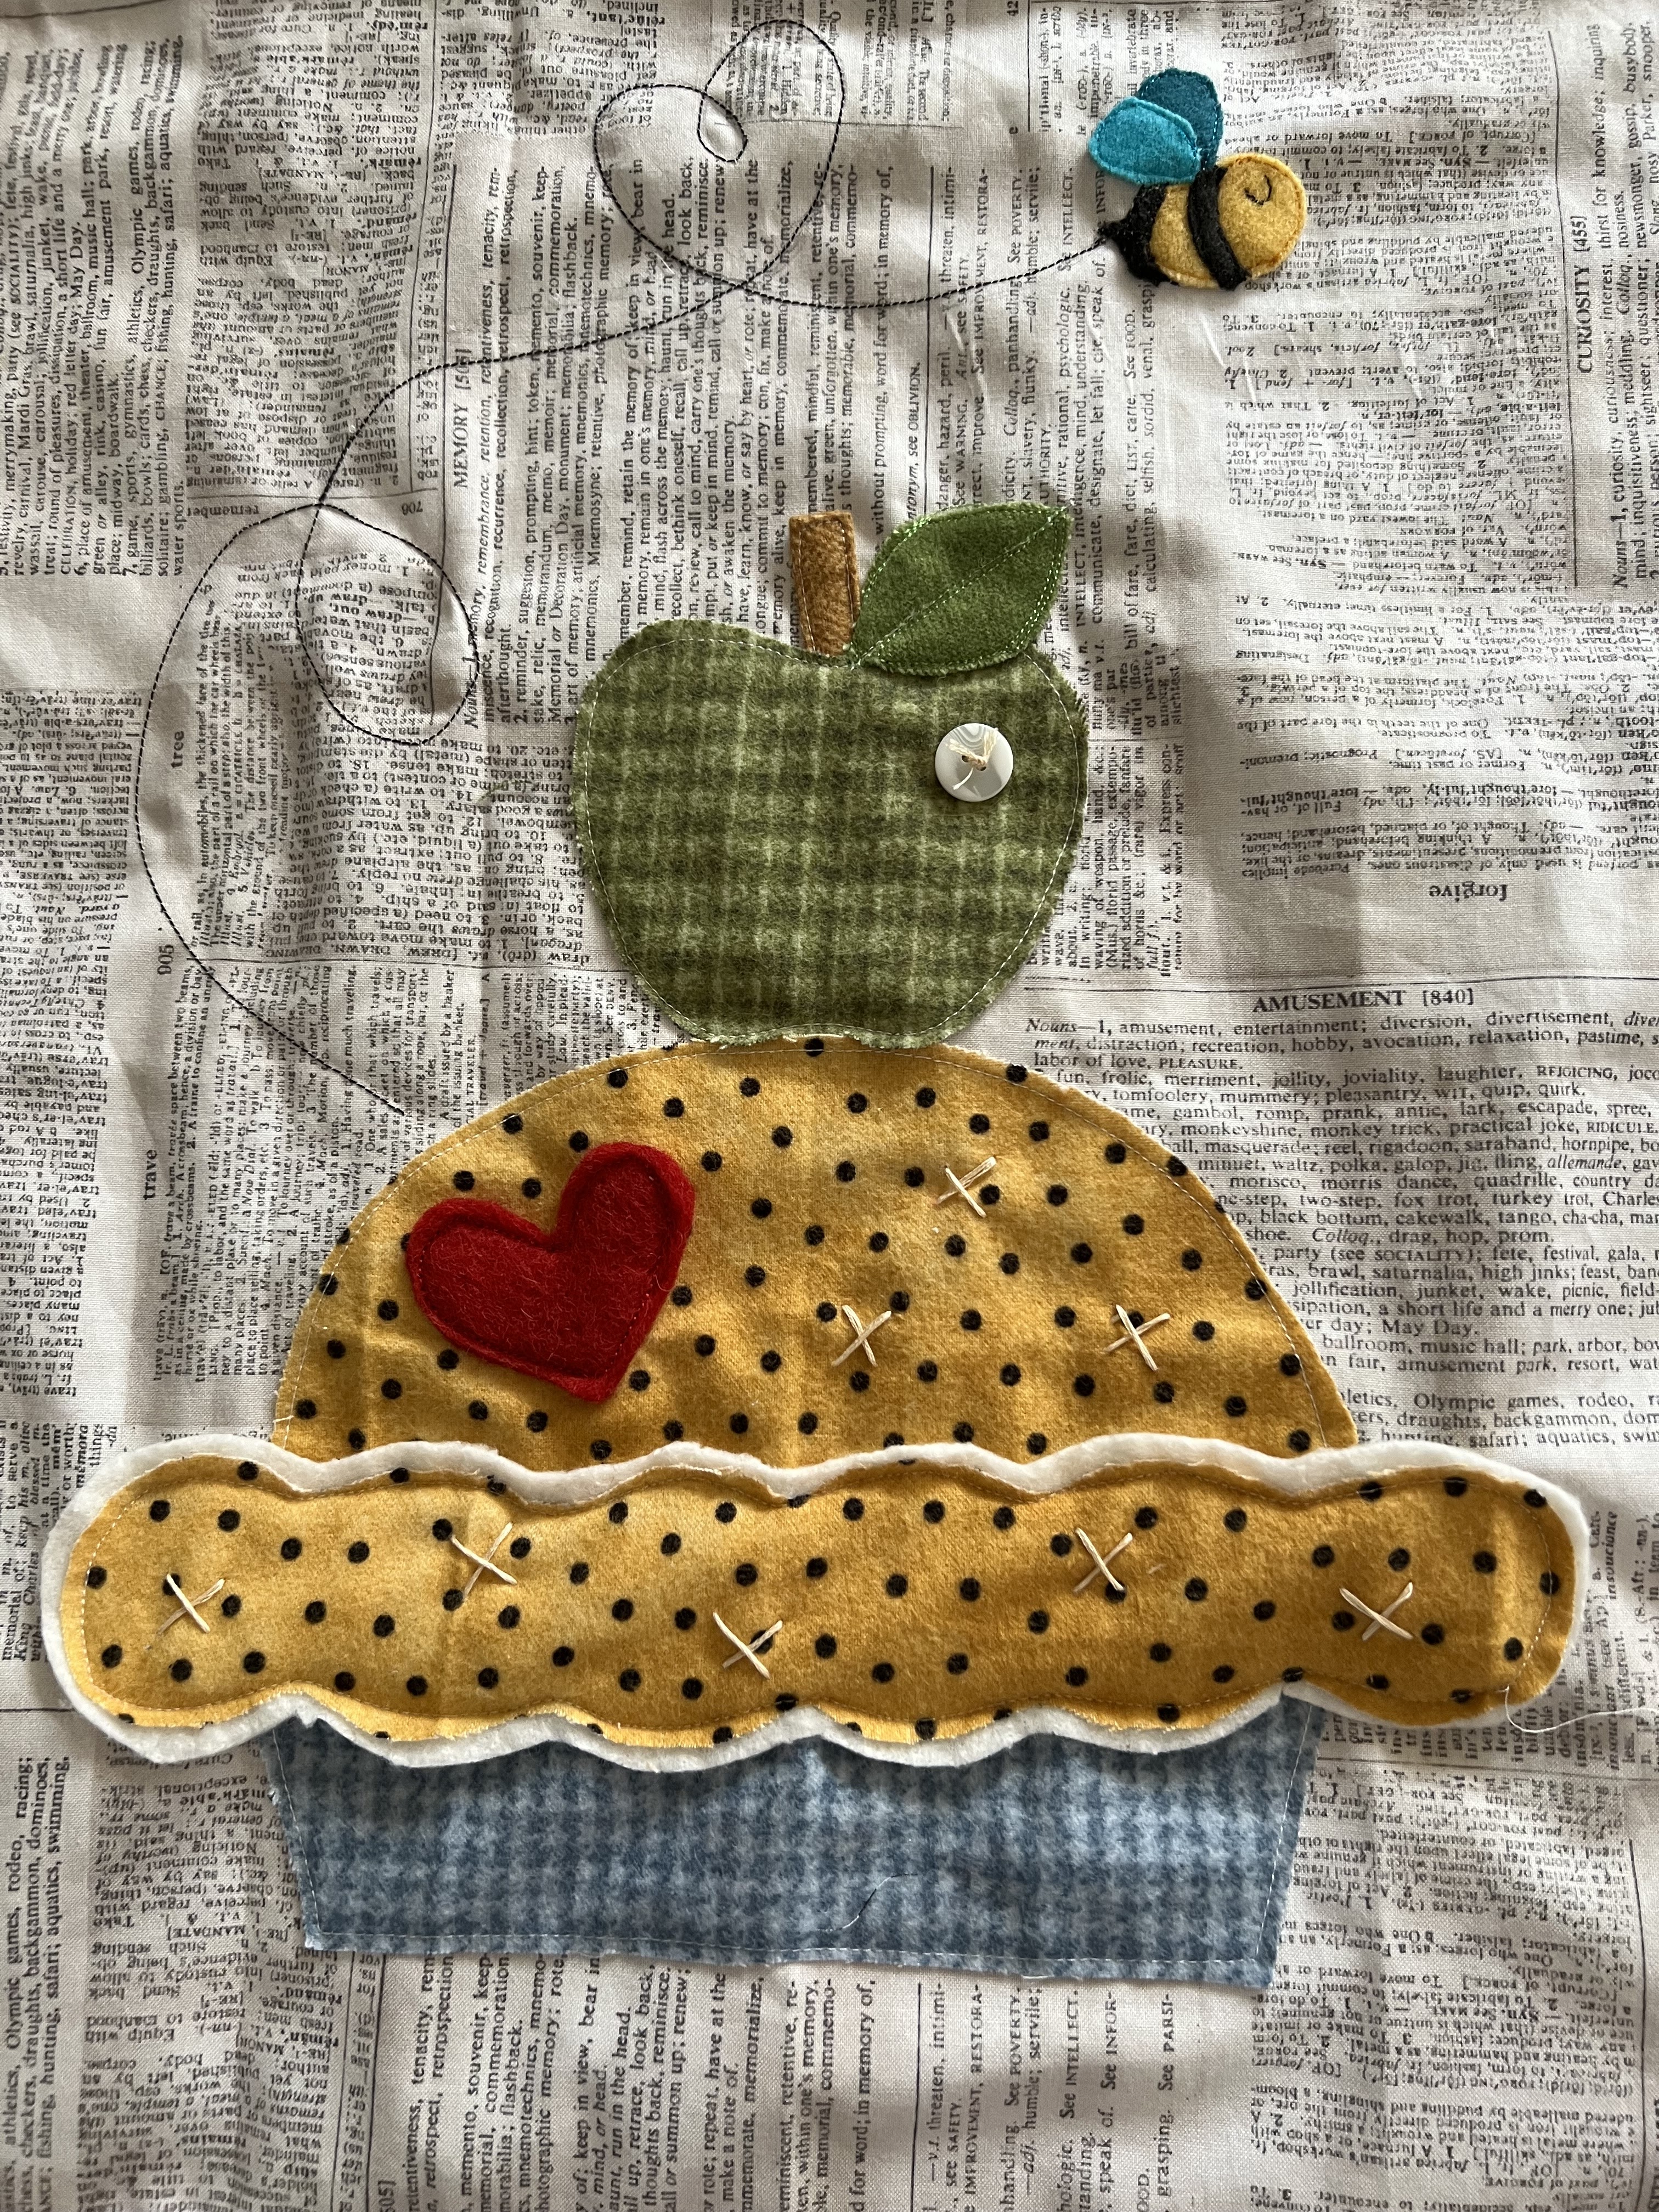
Green apples are a little too sour for me to eat raw, but they make excellent pies.  For my project, I decided to make a table runner featuring Green Apple Pie.


I used wool scraps to make my pie and green apple pieces and sewed them onto a cotton background.  I layered a piece of warm and natural batting behind the crust area to make it stand out.    


A red wool heart added a little color to the pie and a white button highlighted the apple.   


A sassy bumblebee, also made of wool, buzzes lovingly over the pie. I used 6-strand embroidery floss to stitch X'es on the pie and crust.  Instead of using a blanket stitch, I chose to use the raw-edge method because of the batting layer and the tiny size of the bee.  I'm not sure I like it as well.  I finished the 16" x 36" table runner by adding a black and white dotted border.   

We've been having lots of dark, stormy days here in California, so this Little Green Apple Pie table runner is a bright spot in my house.

It's also been cold here and a little lovin' from the oven warms more than just my heart.  One of my favorite apple desserts is Ree Drummond's (The Pioneer Woman) Apple Dumplings.  They are not for anyone on a diet.  


Apple Dumplings


Ingredients

  • 2 

    whole Granny Smith apples

  • 2 

    8-ounce cans of crescent rolls

  • 2 

    sticks of butter

  • 1 1/2 c. 

    sugar

  • 1 tsp. 

    vanilla

  • Cinnamon, to taste

  • 1 

    12-ounce can Mountain Dew soda


Directions

    1. 1Peel and core apples.
    2. 2Cut each apple into 8 slices each.
    3. 3Roll each apple slice in a crescent roll.
    4. 4Place in a 9 x 13 buttered pan. 
    5. 5Melt butter, then add sugar and barely stir. Add vanilla, stir, and pour entire mixture over apples. Pour Mountain Dew around the edges of the pan. Sprinkle with cinnamon and bake at 350 degrees for 40 minutes. 
    6. 6 Serve with ice cream, and spoon some of the sweet sauces from the pan over the top. 
  

I hope you liked my project.  It was a delight to make.  Working with wool is a dream, and I don't know why I don't use it more.  Have to add that on my To Do List. 

Today is the last day of this hop, so be sure to visit all the talented quilters who have contributed to this fun blog hop.  Below is a list of today's participants. 


Tuesday, February 21, 2023

I Am Kinda Sweet On You Blog Hop


Hello!  Today is my day to share with you my project for the I'm Kinda Sweet On You Blog Hop.  Joan at Moosestash Quilting is the creator of this fun blog. Thank you, Joan, for being so sweet and letting me join in the fun!  It's always a treat!

Is there anything sweeter than a cuppa after a long, cold, winter's day?  Whether it's tea, coffee, or hot cocoa, it's the pause that refreshes.  There's nothing I look forward to more than being able to put my feet up with a hot beverage and just let the day roll away. 

This is a quilt I made for my co-worker.  She was having a rough time and needed a little perk, so I decided to gift her a quilt.


In my stash of embroidery files, I had a cute cup with hearts.  The finished embroidered block was 6 1/2".  I added a 3 1/2" border, which finished to a 12 1/2" block.  


The second block was a coffee cup motif I cut to 8 1/2" with a 2 1/2" border all around.  


I added a 2 1/2" and a 4 1/2" border, making the overall quilt measure approximately 44" x 72" -- just big enough to snuggle under and watch tv.  By the smile on her face, I think this sweet quilt brightened her day.    


And now it's time to sit back with a cuppa of my own and go visit the other participants in this fun blog.  I hope you do the same.  

Wednesday Feb 22

Elizabeth Coughlin Designs

Quilting Gail

Just Because Quilts (you are here)

Bea Quilter

Samelias Mum

Kathy's Kwilts and More

Lynns Blog