Saturday, December 26, 2015

Twas the Night Before Christmas . . .

In spite of being sick most of the month of December, I still had a wonderful time.  We celebrated on Christmas Eve this year to accommodate diverse schedules.  We had a formal (ha!) dinner of lasagna and all the trimmings.  Everyone brought their signature dishes and it was a night to remember.

One thing I did want to share was my table setting.  I had decided to keep it simple with just a red tablecloth and colored napkins, but both my daughters-in-law sent me a picture of tables decked out with snowmen.  I LOVE SNOWMEN!  I scrutinized the pictures they sent me, then visited Pinterest for more ideas.  And this is what I created:
 

The red tablecloth was replaced with a white one and red square napkins were used to make up the top hat.  I had some blue snowflakes to set on the table to add a little accent.  Scarves for the snowmen plates were quickly folded from the linen napkins and the silverware was placed just so.  Junior Mints were used for the eyes, baby carrots made the noses, and Hershey's Kisses were used for buttons.   


Is this cute or what?  And easy.

The table was a success with my guests, and Jolly the Elf approved, too.


My table is on the small side, so the end settings got "melted" snowmen.  They were still cute.


Best of all was that my family and I got to share a wonderful meal and spend time together. 

Tuesday, December 22, 2015

Mesh Snowman Wreath

 It's no secret I love snowmen, and when I saw this cute mesh snowman wreath I knew it was going to be this year's project. 

I found everything I needed at JoAnn's except the hat.  The hat I found at Party City.  To make your own, you will need 2 wreath forms (a small and large), 3 rolls of white mesh, a piece of orange felt, a  bag of pipe cleaners, a hot glue gun, and a black plastic hat cut in half.  Don't throw the other half of the hat away!  I used the leftover half to cut the eyes and mouth for my snowman, and then glued to the mesh with the glue gun.  Since the hat is plastic, it will stand up to the cold and wet weather. 

Wire the large and small wreath forms together, then cut the mesh into 10" lengths.  Pinch mesh strips in the center and tie with pipe cleaners, then twist them onto the wreath form.  Glue hat and face features on last.


You can find the instructions and an excellent video on how to make the snowman wreath at http://grillo-designs.com/peggys-snowman-wreath/


 As a finishing touch, I glued a festive piece to his hat and hung some jingle bells from the wreath form.

This is a quick and easy project, but the mesh is unkind to your hands.  My wreath took me about 3 hours to make.  


Frosty Snowman Pretzels

These adorable Snowmen Pretzels are going to be a new Christmas tradition at my house.  Who can resist sweet and salty treats? 

These little guys are as addicting to make as they are to eat! I found round pretzels at my local Albertson's market and bought a bag, thinking I would make wreaths or something with them.

After using the pretzels for my homemade Chex Mix I still had a zillion left.  I began looking for more ideas.

On Pinterest I saw a post on how to melt a Hershey's Kiss inside the pretzel round and top it with an M&M candy.  These did not turn out well for me. 

Then I saw another Pinterest post using the round pretzels and white candy coating (CandiQuik).  I had a bag of miniature M&Ms and a bottle of black icing, so I figured I would give it a try. 

The white candy melted quickly and easily in the microwave and a I used a spoon to fill the rounds.  I picked the orange M&Ms to use as the noses, then used a toothpick dipped in the black icing to dot on the eyes and mouths.  Easy!  (The original recipe for the snowmen used miniature chocolate drops as the eyes, but I didn't have any on hand.)

They were so much fun to make!  My only suggestion is to not do too many at one time.  I had about 40 pretzels filled and by the time I got to the last ones, the white candy was too hard to push in the M&M.  (That's why there is one ghost in the bunch.  What can I say?  I love Halloween.)  


I make goodie bags for neighbors and friends every year and these little guys are going to be included.  I think they'll be a hit!

You can find the post at http://hungryhappenings.com/2013/01/winter-themed-treats-frosty-snowman.html/

Sunday, December 20, 2015

The best laid plans of mice and men often go awry

 I had such big plans for this Christmas.  It is my grandson's first Christmas and I was going to decorate the house to the hilt and do so many things.  I was off to such a good start.  I put up the tree and set out some of my Christmas trinkets.  I put away the table setting we had for Thanksgiving and set the table for Christmas dinner.  My grandson and I went shopping at Target and lingered in the Christmas section.  I thought I was so smart. 

And then on the Flu Bug bit.  The entire family and all our friends got sick.  And before you say it, I DID get my flu shot.  Two weeks later, I began to think about Christmas again. 


So much for big plans.  It got me to thinking though.  We are not promised tomorrow.  Delight in every moment you're given.  They are a gift from God.

Sunday, November 22, 2015

Thanksgiving Tango

I feel like the Tasmanian Devil as I whirl through the house getting ready for Thanksgiving.  There is so much to do, and I love every minute of it!

Thanksgiving is my favorite holiday.  I love to cook (and eat), and every year I try something different to make our dinner special.

This year I found the cutest edible table decorations from Giada on Food Network.  Check out these gobblers.  They are so easy to make.  Check out Giada's video on how to make these cuties for your table. http://www.foodnetwork.com/recipes/giada-de-laurentiis/thanksgiving-turkeys-recipe.html   I'm sure my family is going to love them!


Autumn Table Runner

There are several projects I wanted to complete before Thanksgiving, but it doesn't look like that is going to happen.  One project I did finish was a cute table runner using up some of the scraps from my autumn quilts.  It's just a simple little pattern sewing 2 1/2" squares together, alternating between bright and fall colors .  On either end I added a piece of muslin, approximately 6," and embroidered some simple leaves.  I think the rickrack was a good way to separate the muslin and the patchwork.  The whole runner is approximately 38" x 15."


Wednesday, November 18, 2015

Thanksgiving Gobble Gobble Quilt

Jack is a happy scarecrow!  He knows Thanksgiving is right around the corner and there will be lots of good food to eat and good company with whom to share. 


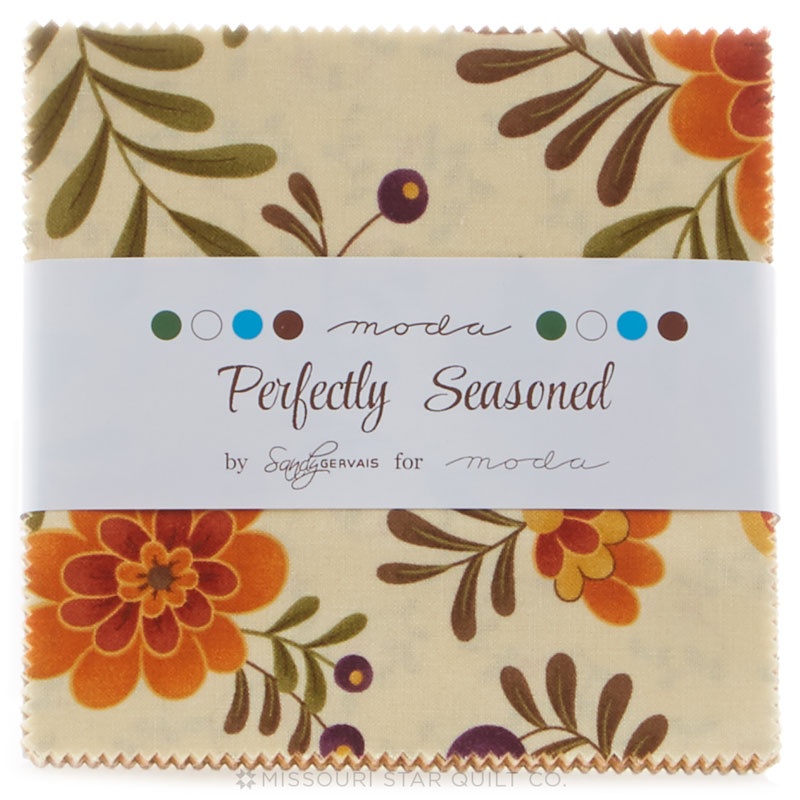
Isn't this print adorable?  It is Perfectly Seasoned by Sandy Gervais for Moda Fabric. I found the most adorable pattern on the Bear Creek Quilting Company blog and just had to make one of my own.  You can download their free Blessings Quilt pattern at www.bearcreekquiltingcompany.com/blog/2015/08/08/blessing-quilt/ 

Although their pattern is adorable, I did my own thing.  I bought the panel and, because I loved the fabric so much, 5 charm packs.  Their finished quilt is 50" x 72" and I didn't want mine quite that big, so I left off the side with the word "Blessings."  My quilt measures approximately 40" x 64."  I like to snuggle  under a lap quilt when I watch television on cold, winter nights, and this size is just perfect.


Monday, November 16, 2015

Christmas Is In My Heart - My Revealing Day!


Christmas Is In My Heart Blog Hop

Welcome to Day 4 of Christmas Is In My Heart Blog Hop!  I am so excited to show you what I made, but first, a big THANK YOU goes out to Marian from Seams To Be Sew for organizing and hosting this hop.  Be sure to visit her site every day for her daily free pattern.
Fat Quarter Shop


And another heart-felt THANK YOU goes to the Fat Quarter Shop for their daily giveaway.  Be sure you enter to win at Marian's blog, Seams To Be Sew.


I love snowmen!  They really do melt my heart.  They are all different, as individual as the snowflakes of which they're made.  So for my contribution I decided to make a quilt showing just how different they are, but cut from the same cloth, so to speak.  I call my quilt  "A Flurry of Snowmen." 


I drew the snowmen first onto a giant sheet of wrapping paper, then traced them with a water-soluble marking pen onto a single piece of white fabric backed with Warm & Natural batting.  I cut away the excess batting and fabric and centered the design onto a single cut of turquoise dotted fabric. With turquoise-colored thread, I machine-stitched around each snowman's outline and their border outline. I then used fusible web to adhere their accessories using a raw-edge applique technique..

It was so much fun seeing each snowman's personality "come to life" as he or she received their hats, mittens and scarves. I was running out of time to get this posted, so they don't have all the embellishments I want to give them, like buttons on their chests.


Marian wanted a heart incorporated into our designs for this hop, so front and center Mrs. Snowman wears a heart.  The lone snowflake falling down is made up of heart and teardrop shapes.  (I believe the snowflake was the hardest part of the quilt!)

I think my favorite has to the little guy holding a frothy cup of Starbucks.  I accomplished that with a little computer-aided wizardry.  Which snowman is your favorite?

Be sure to visit these other talented elves:

Tuesday, November 17 

I hope you all have a wonderful holiday!

Wednesday, November 11, 2015

Christmas Is In My Heart

Christmas Is In My Heart Blog Hop

There are only 44 days until Christmas!  Yikes!  Time to get your jingle on!  And what better way to catch the Christmas spirit than to participate in a Christmas blog hop?

This year Marian from Seams To Be Sew has organized Christmas Is In My Heart blog hop.  It's sure to be loads of fun and full of ideas to inspire you!  The hop begins November 12th and will feature 32 participants.  And if that's not enough, there will be giveaways from the Fat Quarter Shop and Seams To Be Sew that you won't want to miss!  Mark your calendars and join in the fun!

Monday, October 26, 2015

A Cup with Edgar

I found this great picture of Edgar Allan Poe on Pinterest.  It is a caricature by Mario Gonzalez, a very talented artist.  It just begged to be made into a mug rug for Halloween.  With the last of my scraps leftover from The Ghastlies quilt, I put together this tribute to Edgar, one of the greatest writers of all time  -- if you like spooky tales, that is. 


I became insane, with long intervals of horrible sanity. 
Edgar Allan Poe


Sunday, October 25, 2015

A Ghastlies Halloween Quilt

I have been collecting The Ghastlies fabric from Alexander Henry forever.  The characters are so fun and sets the mood perfectly for Halloween.  My stash has sat in a drawer for many years now because I never could decide how best to sew something that would feature this wonderfully creepy family.  And then it came to me -- quotes.  Famously demented quotes from movies or books would separate blocks of The Ghastlies.


 To make the blocks with the quotes, I purchased a packet of Sew-In Computer Fabric and printed my quotes.  Because the printer fabric is 8-1/2" x 11" I cut my family blocks to compliment that size.  The quotes are from the movies Arsenic & Old Lace and The Addams Family, and writers Edgar Allan Poe, Walter Scott, William Shakespeare, and Lewis Carroll.

I sketched a quick "blueprint" of how I wanted to blocks to look, scattering the colors about, and sewed them all together.  Some quick in-the-ditch quilting, a simple black binding, and it was done.  This was truly a make-it-in-a-weekend quilt.

I really liked how this quilt turned out and showed it off to my own family.  Imagine my surprise when they all said, "This quilt looks like you."

Whatever did they mean by that???  

Tuesday, October 20, 2015

Halloween Haunts Blog Hop

Halloween Haunts 2015


Welcome!   

It's my day to reveal my creation for the Halloween Haunts Blog Hop. I had so much fun participating in last year's hop, and when Marian invited me to join in the fun this year, I jumped at the chance.   Many thanks to Marian from Seams To Be Sew for organizing this fabulous hop and inviting me to participate!

Halloween is one of my favorite holidays and quilting is a passion of mine, so why not combine the two and have monsters do a quilting bee?

This was such a fun quilt to make. The hardest part was making the actual quilt background neutral enough to show off the busy hands.  After several attempts, I chose the black and orange fabrics and a very simple pattern.

For the monster participants I chose a witch, Frankenstein's monster, a ghost, and a skeleton.  Several family members and friends saw the quilt as it progressed and most of them liked the ghost best.  Because I'm nuts, I named them all -- Witch Hazel, Frankie, Gabby the Ghost, and Bony Bonnie.

Three of the monsters brought to the quilting bee their own special pincushions.  Gabby has her dead mouse, Frankie has a wacky bat, and Bonnie borrows pins from her voodoo doll.


Witch Hazel brought her own bottle.  And of course there had to a big fat hairy spider with black rick rack legs.


 I used purple velvet to bind my quilt and I think it gives it the perfect creepy yet classy look.


So there you have it, my contribution to the Halloween Haunts Blog Hop.  I hope you are having a wonderful time visiting everybody's sites and seeing their fantastic creations. You can find the entire list of hoppers at Marian's site at Seams to be Sew.  The participants for today's revealing are listed below.


And don't forget to stop by Marian's at  Seams to be Sew and sign up for a chance to win a $25 gift certificate from the Fat Quarter Shop.
Fat Quarter Shop

Happy Haunting!!


Thursday, October 15, 2015

Halloween Haunts

Halloween Haunts 2015
Halloween is nearly here and what better way to start it off  than with a blog hop?!?  The hop starts TOMORROW, October 16th, so mark your calendars and get ready to be happily haunted by all the clever stitchers out there!  The hop has 49 participants this year and will run from October 16th through October 28th.  My day will be October 21st.  I am SO excited to show you what I've created this year.

MORE GOOD NEWS!   The Fat Quarter Shop is giving away a $25.00 gift certificate for each day of the Halloween Haunts hop.  You can enter at any of the featured sites of the day. A winner will be announced daily at Seams To Be Sew, and it will be featured on any of the blogs that featured the giveaway entry for that featured day.


 A big THANK YOU to Marian at Seams To Be Sew for all her hard work in starting this hop and hosting it for all of us Halloween groupies. 
 
Hope to see you there!  

Here is the schedule for Halloween Haunts:


Wednesday, September 9, 2015

Fall Ahead

14 more days until the first day of Autumn and I am ready!  We have had one hot summer here, and this week the temperatures are back in the 100s.  Today it was a hazy 101 degrees and tomorrow 104 degrees is predicted.  Swimming weather!

When the weather is this hot, it is desirable to stay indoors and keep cool.  In honor of cooler temps to come, I made a quick little rail fence and maple leaves quilt out of a fall-themed jelly roll I had on hand.  The overall size of this quilt, before adding the binding, is 40" x 56".  The finished rail fence block is 8" square, finished strips are 2" x 8".  The finished leaf block is made up of 2" squares with a 2" x 6" and a 2" x 8" strip added to make it an 8" square.  (If you are wanting to create your own autumn rail fence/leaf quilt, add 1/2" to these measurements for seams.) 


Now all I need to do is add the backing, do some stitch-in-the-ditch quilting, sew the binding all around, and this will be the perfect quilt to snuggle under on those cool Autumn nights.  I may just wait until the temperature drops a bit before I finish this one.


Tuesday, September 8, 2015

Pretty Potted Pencil Holder

It's no secret, I am not the most organized person in the world.  I lose stuff all the time, especially my pens and pencils.  It is really annoying when I am writing or designing something in my sewing room and my pen disappears.  Then, of course,  there is a frantic search, upending everything to find it.

Out of necessity, I decided to make a pencil holder.  That way I would have access to more than one pen.  I could have used an empty jar or cup just as easily, but I had some terra cotta pots laying about and thought what a cute pencil holder it would make. 


This was a lot of fun to do, and made up fairly quickly.  I used acrylic paints in red, black, brown, and white.  Her cheeks and lips are the red and white paints mixed to the shade I wanted.  The end of the paintbrush was dabbed into white paint to make highlight dots.  I found some accessories in my button jar and embellished a scrap piece of ribbon.  I also found some dolly hair left over from another project and gave my "assistant" a lovely curl.  I have the matching plate that sits under the pot which will be perfect to hold other stuff I easily lose, like bobbins, thread, paperclips, etc.  The plate doesn't need to be painted, but I will glue the two pieces together for practicality. 

As I was making this one, I thought of several more designs I could do and may do more in the future, because afterall I don't just lose pens and pencils in my sewing room.

Monday, September 7, 2015

Labor Day Chili

Happy Labor Day!  Yay!  No work today!  Hope everyone got to sleep in this morning.  I love designated lazy days, when you don't have anything specific planned and the whole day is ahead.

Oh yeah. I have to cook dinner.  (sigh)

In the spirit of the holiday, I think I will cook up a pot of my Taste of Honey Chili and later slap some burgers on the grill.  My chili recipe is my own concoction with a couple of surprise ingredients.  The brewed coffee makes for a heartier base than just water, and the honey and cinnamon add just a hint of sweetness.


Taste of Honey Chili

Ingredients

  • 1 pound lean ground beef
  • 1 cup diced onion
  • 1/2 cup diced green bell pepper
  • 1 or 2 cloves of garlic, finely chopped (or 1 or 2 teaspoons minced garlic from jar)
  • 1 can (40-oz.) kidney, pinto or black beans, drained
  • 1 jar Picante Sauce (your choice:  Mild, Medium or Hot)
  • 1 can (4-oz.) diced green chiles
  • 1 can diced tomatoes, drained
  • 1 cup brewed coffee (left over from breakfast)
  • 1/3 cup honey
  • 1 teaspoon chili powder
  • 1/2 teaspoon crushed dried oregano
  • 1/2 teaspoon ground cumin
  • 1/2 teaspoon cinnamon
  • 1 teaspoon salt
  • 1/2 teaspoon pepper

Directions

  1. Cook beef, onion, bell pepper and garlic in large skillet until beef is browned and onions are translucent; drain.  Transfer to large pot.
  2. To pot, stir in remaining ingredients. Bring to a boil. Reduce heat to low; cover. Cook, stirring frequently, for 20 to 25 minutes.  After chili has cooled, pop it into the refrigerator for a few hours (even overnight) to let the flavors meld.

Suggested garnishes, if desired:
    Shredded cheese
    Diced tomatoes
    Sliced olives
    Chopped green onions
    Sour cream
 
It doesn't get much easier than this, and it's even better the second day.

So, what's cookin' at your house? 

Something Wicked This Way Comes

By the pricking of my thumbs, 
Something wicked this way comes.
Save the date, you must succumb,
This wicked hop will be fun!
 Halloween Haunts 2015
Are you ready for Halloween?  I see pumpkins and scarecrows and costumes everywhere.  If you love Halloween and would like to participate in a fun blog hop featuring your spooky projects, then be sure to sign up for Halloween Haunts 2015. The fun will begin October 16, 2015 when participants will begin revealing their BOO-tiful creations.  Marian at Seams to be Sew is hosting this ghoulish hop, and you can find out all the details on her website.  

Don't be a scaredy cat!  Join in the fun!  Last day to sign up is September 12th.


Tuesday, July 21, 2015

UFOs in my stash

 The other day while tearing through my stash, looking for red fabric, I came upon a UFO -- UnFinished Object.  It was not the answer to my search, but it was a pleasant surprise.  Why had I never finished it?  That got me thinking, how many other UFO's did I have stashed?  I dug deeper and was amazed by how many unfinished projects were stuffed in drawers.


There were no less than I lost count of how many discarded blocks I found that were perfectly suited to making potholders or pincushions.  And a couple of the abandoned quilts could be made into baby blankets by removing a row or two.  I found were, 

Not all of the UFO's I found were projects I would be interested in finishing for gift giving or personal use, but some of them would make nice little blankies for the animal shelter down the street.  Aren't dogs color blind?  They won't mind uneven stitching or what-were-you-thinking patterns. 

Sunday, May 17, 2015

The Little Mermaid

Another baby!  I think it's safe to say we are having a Baby Boom.  My neighbor's daughter is having a little girl and the theme of her nursery is The Little Mermaid.  Although there are a lot of mermaid items you can buy, I decided to draft and create my own quilt.


The colors she requested were teal and coral, so I tried to incorporate them into the quilt.  I admit I cheated some by choosing a background that was already busy with sea creatures, that way I didn't have to much to the quilt.  Truthfully, with this background, I think the mermaids would have been enough, but the seahorse and octopus did add a little more coral to the quilt.  The starfish helped to round out the design.

I used raw-edge applique to add the motifs to the quilt so it was easy to do and was finished in no time.   I am not fond of using buttons for baby quilts, so I used black fabric paint for the facial features.  I could have embroidered the faces, but the paint was quicker and holds up really well in the wash.

Little Ariel is expected early July.  I'm sure she will be the sweetest little mermaid ever.